
 What can be stenciled? Just about anything! Don’t let your imagination end with only walls. How about your shower curtain and some matching linen hand towels in the bathroom, a table runner for the kitchen or living room curtains.
What do you need to stencil? A few simple supplies are all you’ll need to begin your stenciling project. We’ve listed the necessary items below, along with a few tips on what to look for and how to use them. You’ll find even more instructional information and photos in our book, Stenciling the Arts & Crafts Home.
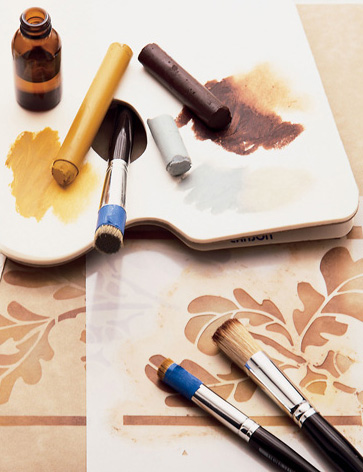
A Stencil – Obviously, the first item you will need to begin stenciling is a stencil. So what exactly is a stencil? A stencil is a pattern or design that is cut out of a material such as plastic or heavy paper stock. When paint is applied on top of the stencil plate, the color is transferred only through the openings, recreating the design on the chosen surface, such as a wall or piece of fabric. Vintage stencils were originally hand-cut from materials such as heavy weight paper (referred to as “oil board”), metals such as brass or tin or flexible material like canvas or leather. Today, stencils are usually produced in multiples by a computerized laser cutter out of clear plastic that runs between 5 to 7 millimeters thick. They are flexible, quite durable and very easy to use.
Paint – Exceptional blending & shading qualities of Paintstiks® and their ease in use, make them a superior paint medium to stencil with, beginners and pros alike. Skip the acrylics unless you have to use them, and definitely if you have never stenciled before. Simply scribble the Paintstik® onto a smooth nonporous palette and transfer the paint with a stencil brush to the stencil openings. About the consistency of lipstick, this paint is very clean and easy to use. When heat set, it is washable and works wonderfully on fabrics as well as walls. A lower latex paint sheen, like Flat & Eggshell, will provide the best surfaces for these paints to adhere to, providing faster drying times and more intense colors as well. Since you use a dry brush technique with these paints, you can readily move the stencil plate when you have finished stenciling it and reposition it right away. Complete drying time takes about 24 hours. The sticks are sold individually or in mini set combinations. The mini sticks often will contain enough paint for a small job or are a good way to sample the paint and colors. One stick per color of the individually sold sticks, is usually more than enough for most jobs. For more information on using the paintstiks or working with acrylics, see the “Conjuring Up a Paint Medium” section on page 51-57 of our book.
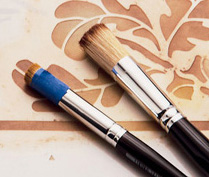 Brushes – The ends of stencil brushes are flat. The sole purpose in the life of this particular type of brush is to stencil, so you want to make sure you use them properly. The brushes should be held at a 90-degree angle, perpendicular to the surface they are retrieving paint from or depositing it on. The flat end prevents the bristles from sliding under the stencil plate, thus giving the design a sharp crisp edge. Using good quality, soft China bristle brushes will allow for great shading and blending, and also make the job easier. You’ll need one brush for each color used. While one person may like a larger brush because it will be faster, another may prefer a smaller brush that allows more control. For this reason we recommend a variety of sizes to start with allowing you to see what you like best. For brush size suggestions for each design, refer to the individual designs our website. (TIP OF THE TRADE: wrap the bristles with masking tape like the brush on the left, leaving about 1/4″ of the end bristles showing – this will firm up your brush and give you more control).
Stencil Adhesive – Repositionable Stencil Adhesive makes stenciling walls and fabric much, much easier, This revolutionary product creates a temporary bond on the back of the entire stencil plate, basically turning it into a great big Post-It® note. A light spray over the back of a stencil (this ain’t a 50’s hairdo) will allow you to reposition it over and over, without re-coating or leaving a residue. In an average room you will only need to re-coat your stencil a few times, whenever it starts to loose tack, so one can should be plenty. This product also helps eliminate paint seeping under the stencil plate by holding down the bridges, therefore creating crisper images. There may be a few diehards or those who are unfamiliar with stenciling that still insist on using tape to secure the stencil in place, but this product really does make the job much simpler. One thing to note: there are many forms of adhesive in an aerosol can, so make sure the label says it is repositionable (not mounting adhesive) and be sure to shake the can well before you use it. We recommend Krylon Easy Tack.
Brush Cleaner – “The Master’s®” Brush Cleaner & Preserver” is a product we highly recommend. This nontoxic all purpose brush cleaner not only allows the oil based Paintstiks® to be clean up with water, but when used our with our handy scrubber creates a super fast cleanup of your brushes! This marvelous cleaner works with any paint medium, so whether you decide to use the oil based paintstiks or a water based medium, this product will not only clean, but preserve your stencil brushes as well.